Programming Lanbox cues with Java
Introduction
The third act in the production "Simon the Fiddler" ("Simon Vedelaar") by theatre company EJA, is situated in an amusement arcade. To create an amusement arcade kind of atmosphere, something with colorful flashing lights was called for. We came up with the idea of mounting nine RGB LED bars in a fan like layout on which we would play various chases from a Lanbox.
You can watch the vidio clips for an impression of the lighting effects that were created.
Instead of programming the Lanbox cuesteps by hand one by one, we wrote a program in the Java language to generate these cuesteps. This program leverages functionality that already exists in the Lassi code base. The idea was to try to find an elegant, compact and quick way to program the various effects. There are more ways to program the Lanbox; this is just one more way that could be helpful for somebody knowing (or wanting to learn) the Java programming language.
In this tutorial we will have a look at how the Lanbox cue lists are generated by this program and how the cues were controlled during the performance from a web browser page.
The fixture setup
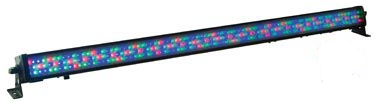
Before diving into the software part of this tutorial, we will have a quick look at the hardware setup. We used nine American DJ Mega bar LED fixtures. This LED bar has a length of about 1m and contains a total of 252 10mm LEDs (48 red, 108 green, 96 blue).
Here are some pictures (click on the pictures to enlarge):

|
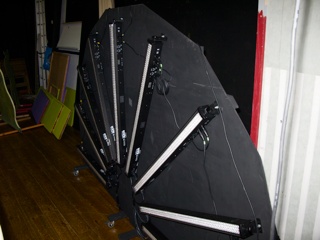
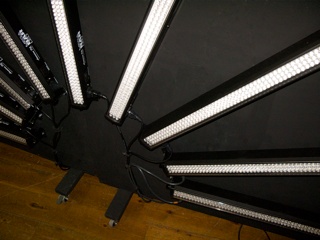
The LED-bars are mounted in fan like shape on two wooden panels. |
|
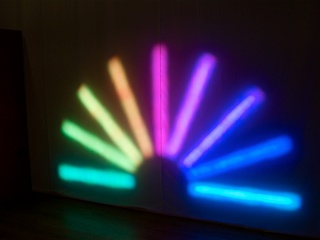
The panel is placed about 30cm behind a white backdrop. This way the audience gets to see the mixed colors through the backdrop, and not the colors of the individual LEDs. |
|
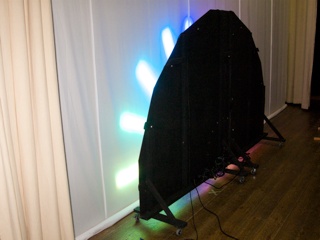
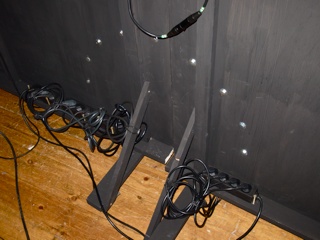
A view behind the white backdrop. The supports on which the panels are mounted did get casters so that the construction could be removed quickly by the end of the scene when the actors passed behind the backdrop and had their shadows projected on the backdrop. |
|
The LED bars are bolted on the wooden panels. The DMX cables are situated at one end of the bars, and the power connections at the other end. |
|
The center of the circle. |
|
The power cables are plugged in at the back of the panels. |
|
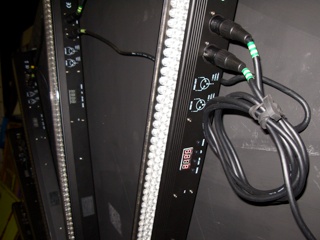
This picture shows the dmx in and dmx out connections of the LED bar and the four character display that is used for setting the fixture mode and dmx address. |
|
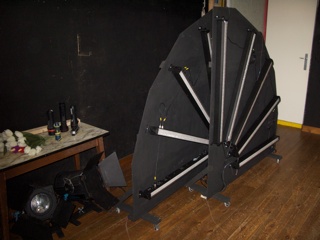
Another view of the two panels with the LED bars. In the lower left corner you can also to the two ADB prism convex spotlights that were used to project the actor shadows on the backdrop. |
Writing cue lists in Java
Before looking at the program that was used to create the cue lists for the show, we first have a look at a simple program that creates a simple small cue list from Java:
    1  import be.lassi.lanbox.tools.CueListBuilder;
    2
    3  public class Hello extends CueListBuilder {
    4
    5      public static void main(final String[] args) {
    6          new Hello().test();
    7      }
    8
    9      public void test() {
   10          createCueList("HELLO");
   11          writeCueLists();
   12      }
   13  }
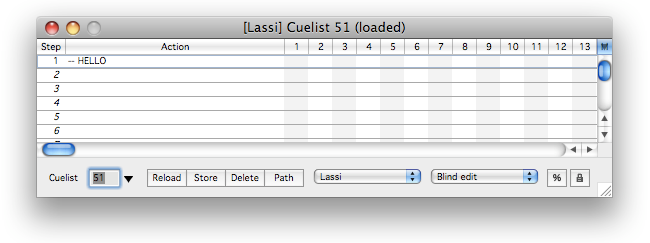
The sample program extends class CueListBuilder. This class contains methods that help in creating cue lists. The createCueList() method creates a new cue list. The first cue step in the new cue list is a comment cue step with the comment text taken from the method parameter. The writeCueLists() method is used to send the cue list to the Lanbox, which will store it ready for execution.
When programming cue lists for the Lanbox in Java, the most comfortable will be to do this from your favourite integrated Java development environment. We use Eclipse. Since the instructions for each development environment would be a bit different, here we explain only how to compile and run the program from the command line.
Save the above code in a file Hello.java in the lassi folder (the folder that also contains file lassi.preferences).
Compile the program:
javac -cp lassi.jar Hello.java
On Mac OS X, the folder structure is slightly different. You will need the following command to compile the program:
javac -cp Lassi.app/Contents/Resources/java/lassi.jar Hello.java
The compile step will generate the file Hello.class in the lassi folder. Use the following command to run the program:
java -cp .;lassi.jar Hello
On Mac OS X, you can use:
java -cp .:Lassi.app/Contents/Resources/java/lassi.jar Hello
This is what the resulting cue list looks like in LCEdit+.
We are now ready to have a look at the actual program.
Step 1: Defining the fixtures
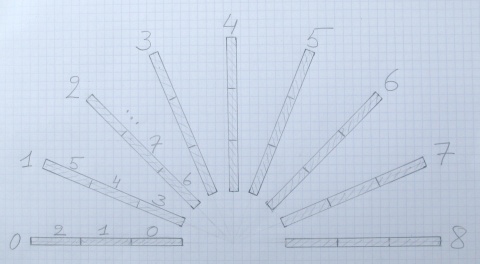
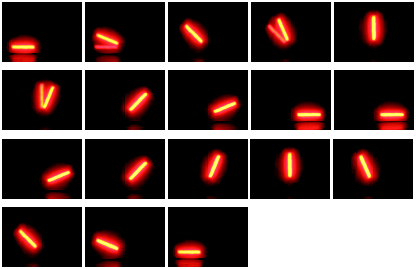
The first step in the program is to define the fixtures that we are working with. The bars are numbered from left to right. Each bar contains three segments that can be controlled indepedantly. The segments are numbered from the fan center to the outside, and from left to right.
The LED-bars can be used in six different DMX modes of operation, using 2, 3, 4, 6, 7 or 11 DMX channels. We need the 11-channel mode in which we can address the red, green and blue attributes in the three segments in the bar separately.
| Channel | Value | Function |
|---|---|---|
| 1 | 0 to 255 | 0% to 100% Segment 1 RED |
| 2 | 0 to 255 | 0% to 100% Segment 1 GREEN |
| 3 | 0 to 255 | 0% to 100% Segment 1 BLUE |
| 4 | 0 to 255 | 0% to 100% Segment 2 RED |
| 5 | 0 to 255 | 0% to 100% Segment 2 GREEN |
| 6 | 0 to 255 | 0% to 100% Segment 2 BLUE |
| 7 | 0 to 255 | 0% to 100% Segment 3 RED |
| 8 | 0 to 255 | 0% to 100% Segment 3 GREEN |
| 9 | 0 to 255 | 0% to 100% Segment 3 BLUE |
| 10 | 0 to 255 | All segments strobe slow to fast |
| 11 | 0 to 255 | All segments 0% to 100% Intensity |
In our program (and in LCEdit+) we will act as if each segment in each LED-bar is a separate RGB-fixture. We will set the intensity (channel 11) in all bars to 100% and the strobe (channel 10) to OFF (value 0).
This is how we create a single RGB fixture in our Java code (see Simon.java for the complete program):
   303      private Fixture rgb(final int address) {
   304          FixtureDefinition definition = new FixtureDefinition();
   305          definition.addAttribute("Red", "1");
   306          definition.addAttribute("Green", "2");
   307          definition.addAttribute("Blue", "3");
   308          return new Fixture(definition, "", address);
   309      }
Class FixtureDefinition defines what a single fixture looks like. The fixture definition describes what each of the channels in the fixture is used for: the fixture attributes. In lines 305 to 307 we specify that we will be using 3 channels: "Red", "Green" and "Blue".
The actual fixtures are represented by Fixture objects. Line 308 creates the fixture with the address specified in the method parameter.
Our conventional fixtures will be represented by a generic dimmer fixture with a single attribute: "Intensity". We will also use the same dimmer fixture type for the strobe and dimmer intensity channels in the LED bars.
   311      private Fixture dimmer(final int address) {
   312          FixtureDefinition definition = new FixtureDefinition();
   313          definition.addAttribute("Intensity", "1");
   314          return new Fixture(definition, "", address);
   315      }
We will store the fixtures that we create in separate Fixtures collections according to their use:
    45      private final Fixtures conventionals = new Fixtures();
    46      private final Fixtures segments = new Fixtures();
    47      private final Fixtures strobes = new Fixtures();
    48      private final Fixtures dimmers = new Fixtures();
We will also want to prepare some FixtureGroups so that we can manipulate or iterate over multiple fixtures in one go. We will group the fixtures per bar, so that we will be able to set the color in all three segments of a bar in one action. The bars field will contain a collection with nine elements, each of which is a collection of the three segment fixtures of that bar.
    42      private static final int BAR_COUNT = 9;
    43      private static final int SEGMENTS_PER_BAR = 3;

    50      private final FixtureGroups bars = new FixtureGroups(BAR_COUNT);
    51      private final FixtureGroups circles = new FixtureGroups(SEGMENTS_PER_BAR);
We also want to be able to address the separate circles in the fan. The inner circle will be formed from the segments 0, 3, 6, 9, 12, 15, 18, 21 and 24. The middle circle is formed from the segments 1, 4, 7, 10, 13, 16, 19, 22 and 25. The outer circle is formed from the segments 2, 5, 8, 11, 14, 17, 20, 23 and 26.
We want to use the lower address range in the DMX universe for other convential fixtures that are used in the show. We start numbering the RGB fixture channels from DMX address 70. Each fixture uses 3 DMX channels. So, the fixture address are 70, 73 and 76 for the first LED bar, and 81, 84 and 87 for the next LED-bar, etc.
The following code builds all fixtures and the fixture groups:
    40      private static final int START_ADDRESS = 70;

    85      private void buildFixtures() {
    86          int address = 1;
    87          for (int i=0; i < START_ADDRESS - 1; i++) {
    88              conventionals.add(dimmer(address++));
    89          }
    90          for (Fixtures bar : bars) {
    91              for (Fixtures circle : circles) {
    92                  Fixture segment = rgb(address);
    93                  segments.add(segment);
    94                  circle.add(segment);
    95                  bar.add(segment);
    96                  address += 3;
    97              }
    98              strobes.add(dimmer(address++));
    99              dimmers.add(dimmer(address++));
   100          }
   101      }
Step 2: Creating a first cue list
For a first cue list we want to create a chase that cycles through the three circles from the inner to the outer circle, and repeat this cycle for different colors.

This is the code to generate this chase:
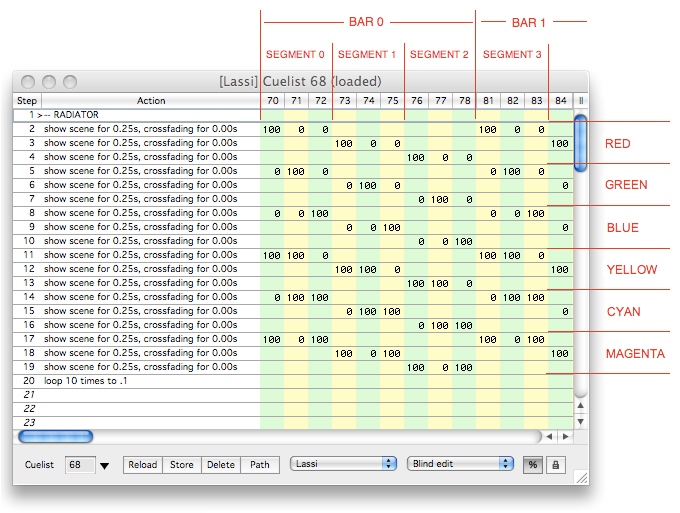
   265      private void radiator() {
   266          createCueList("RADIATOR");
   267          for (Color color : new Colors()) {
   268              for (Fixtures circle : circles) {
   269                  setColor(circle, color);
   270                  hold(millis(250));
   271              }
   272          }
   273          loopTo(1, 10);
   274      }
Yep, that is all !!!
The code above generates a 20 step cue list in which a total of 486 channel values are set. This is what the generated cue list looks like in LCEdit+:
Let us have a look at this code in some more detail. In order to be able to use the services of the CueListBuilder class in our program, we will inherit from that class.
38 public class Simon extends CueListBuilder {
The createCueList() method in CueListBuilder creates the new cue list. The string in the method parameter is used in a comment cue step that is immediately added to the new cue list. The string length should not exceed the maximum Lanbox comment length of 8 characters, and can only contain following characters or a space:
ABCDEFGHIJKLMNOPQRSTUVWXYZabcdefghijklmnopqrstuvwxyz0123456789-
Multiple comment cue steps can be added by separating the comment strings with newline character, like so:
createCueList("LINE1\nLINE2\nLINE3");
By default the Colors class contains following colors: red, green, blue, yellow, cyan and magenta. These are the colors that we iterate through in the for loop at line 267.
The setColor() method sets the color of a given fixture, all fixtures in a given fixture collection or fixture group collection.
The hold() adds a "show scene" cuestep with the currently collected channel values.
The loopTo() method adds a cuestep to jump to a given cue list step, and repeat the jump the specified number of times. In our case we jump back to the start of our cuelist 10 times.
Step 3: Setup stage window in LCEdit+
The panels with the LED bars did not get assembled until the very last rehearsal of the show. While programming we used LCEdit+ to visualize the effects.
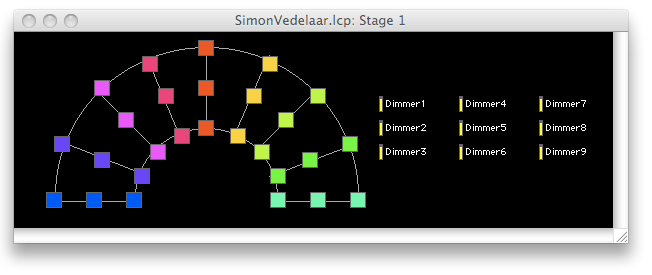
The black background and fan drawing was prepared in a bitmap image which was copied into the stage window: copy the image into the paste buffer, ctrl-click on the stage window, and select Paste Background from the popup menu. For the segments the fixture type "RGB Dimmer Pack" in category "Generic" was selected. For the dimmer channels, the fixture type "Single Dimmer Channel" in "Generic" was selected.
For the segment fixtures, the following view options were choosen:
- Small
- Label Hidden
- Color indicator
The dimmer fixtures use following view options:
- Small
- Icon Hidden
- Intensity indicator
Step 4: Create more effects
We are now ready to create more effects.
a) Random effect
For this effect we simply want to light up each of the segments one by one in quick succession in random order. This is the code:
   255      private void random(final String colorName) {
   256          createCueList("RANDOM\n" + colorName);
   257          Color color = NamedColor.getColor(colorName);
   258          for (Fixture segment : segments.shuffled()) {
   259              setColor(segment, color);
   260              hold(millis(50));
   261          }
   262          loopTo(1, 10);
   263      }
The colorName method parameter allows us to repeat this effect for different colors. For each color ad different cuelist is created. We do include the color name in the cuelist comment so that we can easily identify the cuelists in the Lassi cuelist browser (Windows > Tryout > Cue List Browser).
On line 258, the shuffled() method produces a copy of the segments collection with all fixtures at a random new position in the new collection. On line 259 we set the color of the randomly choosen segment, and on the next line we perform the crossfade to the new scene and hold this scene for 50 milliseconds.
b) Wiper effect
In the Wiper effect we cycle through the LED bars from left to right, and the back from right to left (much like a windshield wiper on a car would do), and repeat this for different colors.
Here is the code:
   143      private void wiper1() {
   144          createCueList("WIPER1");
   145          Time holdTime = millis(50);
   146          Colors colors = new Colors("red", "green", "blue", "yellow");
   147          for (Color color : colors) {
   148              for (Fixtures bar : bars) {
   149                  setColor(bar, color);
   150                  hold(holdTime);
   151              }
   152              for (Fixtures bar : bars.reversed()) {
   153                  setColor(bar, color);
   154                  hold(holdTime);
   155              }
   156          }
   157          loopTo(1, 10);
   158      }
In line 148 to 151, we cycle through the LED bars from left to right. In line 152 to 156, we go back from right to left. The reversed() method on line 152 produces a copy of the bars collection with all elements in the collection in reverse order.
c) Another Wiper effect
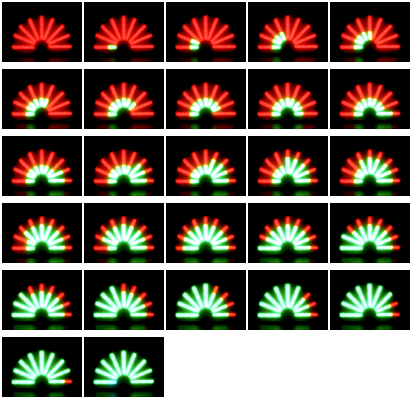
Here is a variation to the Wiper effect. Instead of having only 1 bar lit at a time, we fill the bars from left to right (and back again) against a background color.
We use the barColors collection to keep track of the current colors of each bar. In line 165 this collection is initialized with 9 elements, each with the first color in our colors collection, to set the initial color of all bars.
   160      private void wiper2() {
   161          createCueList("WIPER2");
   162          Time time = millis(150);
   163          Colors colors = new Colors();
   164          Color color = colors.next();
   165          Colors barColors = new Colors(color, bars.size());
   166          for (int i=0; i < 4; i++) {
   167              color = colors.next();
   168              for (int j=0; j < bars.size(); j++) {
   169                  barColors.set(j, color);
   170                  setColors(bars, barColors);
   171                  hold(time);
   172              }
   173              color = colors.next();
   174              for (int j=bars.size() - 1; j > 0; j--) {
   175                  barColors.set(j, color);
   176                  setColors(bars, barColors);
   177                  hold(time);
   178              }
   179          }
   180          loopTo(1, 10);
   181      }
The two for loops on lines 168 and 174 loop through the bars from left to right and from right to left respectively. Within the loops, the barColors collection is first updated and then the color of all bars is set (using setColors()).
d) Three circle wiper effect
Here is yet another variation to the Wiper effect. Instead of iterating over the bars, we iterate over the segments in the three circles. Like so:
To make this easy, we create the new collection (called fixtures) that contains all segments in the order that we need. First we add all segments in the inner circle from left to right, then the segments in the middle circle (right to left) and then the segments in the outer circle (left to right again).
   183      private void threeCircleWiper() {
   184          createCueList("3 CIRCLE\nWIPER");
   185
   186          Fixtures fixtures = new Fixtures();
   187          fixtures.addAll(circles.get(0));
   188          fixtures.addAll(circles.get(1).reversed());
   189          fixtures.addAll(circles.get(2));
   190
   191          Colors colors = new Colors("green", "blue", "red");
   192          Colors fixtureColors = new Colors(colors.last(), fixtures.size());
   193          for (Color color : colors) {
   194              for (int i=0; i < fixtures.size(); i++) {
   195                  fixtureColors.set(i, color);
   196                  setColors(fixtures, fixtureColors);
   197                  hold(millis(50));
   198              }
   199          }
   200          loopTo(1, 10);
   201      }
e) Rotating wheel effect
Next up is a rotating wheel effect, where the LED bars are like the spokes in a wheel.

We basically have three different steps. In each step three LED bars (three spokes in the wheel) are lit. The first spoke group has bars 0, 3 and 6. The second spoke group has bars 1, 4 and 7. The third spoke group has bars 2, 5, and 8. We use a separate method to create these spoke groups:
   230      private FixtureGroups buildSpokeGroups() {
   231          Fixtures spokeGroup1 = new Fixtures();
   232          spokeGroup1.addAll(bars.get(0));
   233          spokeGroup1.addAll(bars.get(3));
   234          spokeGroup1.addAll(bars.get(6));
   235
   236          Fixtures spokeGroup2 = new Fixtures();
   237          spokeGroup2.addAll(bars.get(1));
   238          spokeGroup2.addAll(bars.get(4));
   239          spokeGroup2.addAll(bars.get(7));
   240
   241          Fixtures spokeGroup3 = new Fixtures();
   242          spokeGroup3.addAll(bars.get(2));
   243          spokeGroup3.addAll(bars.get(5));
   244          spokeGroup3.addAll(bars.get(8));
   245
   246          FixtureGroups spokeGroups = new FixtureGroups();
   247
   248          spokeGroups.add(spokeGroup1);
   249          spokeGroups.add(spokeGroup2);
   250          spokeGroups.add(spokeGroup3);
   251
   252          return spokeGroups;
   253      }
And this is how we make the wheel turning:
   215      private void wheel() {
   216          createCueList("WHEEL");
   217          FixtureGroups spokeGroups = buildSpokeGroups();
   218          int cueStepNumber = nextCueStepNumber();
   219          for (Color color : new Colors()) {
   220              for (Fixtures spokeGroup : spokeGroups) {
   221                  setColor(spokeGroup, color);
   222                  hold(millis(100));
   223              }
   224              loopTo(cueStepNumber, 10);
   225              cueStepNumber = nextCueStepNumber();
   226          }
   227          loopTo(1, 10);
   228      }
Note how we use a series of loops that are nested in one main loop in this cuelist (see loopTo() methods at line 224 and 227. The nextCueStepNumber() method is used to record the cue step number to jump back to in the inner loops.
This is what the resulting cue list looks like in LCEdit+ (the outer loop in red, the first inner loop in blue):
    1  -- WHEEL
    2  show d02 for 0.10s, crossfading for 0.00s
    3  show d03 for 0.10s, crossfading for 0.00s
    4  show d04 for 0.10s, crossfading for 0.00s
    5  loop 10 times to .2
    6  show d06 for 0.10s, crossfading for 0.00s
    7  show d07 for 0.10s, crossfading for 0.00s
    8  show d08 for 0.10s, crossfading for 0.00s
    9  loop 10 times to .6
   10  show d10 for 0.10s, crossfading for 0.00s
   11  show d11 for 0.10s, crossfading for 0.00s
   12  show d12 for 0.10s, crossfading for 0.00s
   13  loop 10 times to .10
   14  show d14 for 0.10s, crossfading for 0.00s
   15  show d15 for 0.10s, crossfading for 0.00s
   16  show d16 for 0.10s, crossfading for 0.00s
   17  loop 10 times to .14
   18  show d18 for 0.10s, crossfading for 0.00s
   19  show d19 for 0.10s, crossfading for 0.00s
   20  show d20 for 0.10s, crossfading for 0.00s
   21  loop 10 times to .18
   22  show d22 for 0.10s, crossfading for 0.00s
   23  show d23 for 0.10s, crossfading for 0.00s
   24  show d24 for 0.10s, crossfading for 0.00s
   25  loop 10 times to .22
   26  loop 10 times to .1
This is what the cuelist looks like in the LCEdit+ "export" format:
   // Cuelist 61 (26 steps), loaded 5/17/09 11:42 AM
   001:
     -- WHEEL
   002:
     show d02 for 0.10s, crossfading for 0.00s
     show d03 for 0.10s, crossfading for 0.00s
     show d04 for 0.10s, crossfading for 0.00s
     loop 10 times to 002
   003:
     show d06 for 0.10s, crossfading for 0.00s
     show d07 for 0.10s, crossfading for 0.00s
     show d08 for 0.10s, crossfading for 0.00s
     loop 10 times to 003
   004:
     show d10 for 0.10s, crossfading for 0.00s
     show d11 for 0.10s, crossfading for 0.00s
     show d12 for 0.10s, crossfading for 0.00s
     loop 10 times to 004
   005:
     show d14 for 0.10s, crossfading for 0.00s
     show d15 for 0.10s, crossfading for 0.00s
     show d16 for 0.10s, crossfading for 0.00s
     loop 10 times to 005
   006:
     show d18 for 0.10s, crossfading for 0.00s
     show d19 for 0.10s, crossfading for 0.00s
     show d20 for 0.10s, crossfading for 0.00s
     loop 10 times to 006
   007:
     show d22 for 0.10s, crossfading for 0.00s
     show d23 for 0.10s, crossfading for 0.00s
     show d24 for 0.10s, crossfading for 0.00s
     loop 10 times to 007
     loop 10 times to 001
f) Rainbow effect
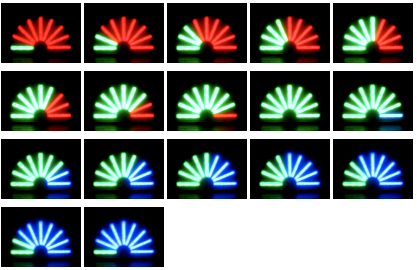
The fan like shape in which the LED bars are mounted more or less asked for the creation of a rainbow effect. We made the rainbow rotate slow or fast.

The rainbow colors are created using the HSB (Hue, Saturation, Brightness) color model, in which we keep the saturation and brightness values at 1, and vary the hue value in 30 steps between 0 and 1.
   276      private void rainbow(final String name, final int time) {
   277          createCueList(name + "\nRAINBOW");
   278          Time fadeTime = millis(time);
   279          Time holdTime = fadeTime;
   280
   281          int steps = 30;
   282          float start = 0.0f;
   283          float delta = 1.0f / steps;
   284
   285          for (int i=0 ; i < steps; i++) {
   286              for (int j=0 ; j < bars.size(); j++) {
   287                  float hue = start + (j * 0.1f);
   288                  if (hue > 1f) {
   289                      hue -= 1f;
   290                  }
   291                  Color color = colorWithHue(hue);
   292                  setColor(bars.get(j), color);
   293              }
   294              crossFade(fadeTime, holdTime, true);
   295              start += delta;
   296              if (start > 1.0f) {
   297                  start = start - 1f;
   298              }
   299          }
   300          loopTo(1, 100);
   301      }
Step 5: Setting up the layers and the baseline levels
We use the following code to create a cue list that prepares the Lanbox layers for our show:
   103      private void setupLayers() {
   104          createCueList("SETUP");
   105
   106          resetLayer(LAYER_A);
   107          resetLayer(LAYER_B);
   108          resetLayer(LAYER_C);
   109          resetLayer(LAYER_D);
   110
   111          setLayerMixMode(LAYER_A, MixMode.HTP);
   112          setLayerMixMode(LAYER_B, MixMode.HTP);
   113          setLayerMixMode(LAYER_C, MixMode.HTP);
   114          setLayerMixMode(LAYER_D, MixMode.COPY);
   115      }
We will set the default values for all our channels in Lanbox layer "D" using following cue list:
   117      private void baseLine() {
   118          createCueList("BASELINE");
   119          setIntensity(conventionals, 0);
   120          setIntensity(dimmers, 0);
   121          setIntensity(strobes, 0);
   122          setColor(segments, Color.BLACK);
   123          crossFade(seconds(2), Time.FOREVER);
   124      }
The dimmer channels of the LED bars can be manipulated using the following cue lists:
   126      private void dimmersOn() {
   127          createCueList("DIMMERS\nON");
   128          setIntensity(dimmers, 100);
   129          crossFade(seconds(2), Time.FOREVER);
   130      }
   131
   132      private void dimmersOff() {
   133          createCueList("DIMMERS\nOFF");
   134          setIntensity(dimmers, 0);
   135          crossFade(seconds(2), Time.FOREVER);
   136      }
Finally, we add a cue list that will allow us to immediately stop the current active cue list on the LED bars (we run all cue lists on layer "A"):
   138      private void stop() {
   139          createCueList("STOP");
   140          resetLayer(LAYER_A);
   141      }
Step 6: Write the cue list to the Lanbox
The cue list created in the previous step exists in the program memory only. In order to actually write it over the tcp/ip connection to the Lanbox, we have to perform the writeCueLists() method of CueListBuilder.
80 writeCueLists();
You can use the cue list browser (Windows > Tryout > Cue List Browser) to have a look at the cue lists that have been generated. Our cue lists start at cue list number 51.
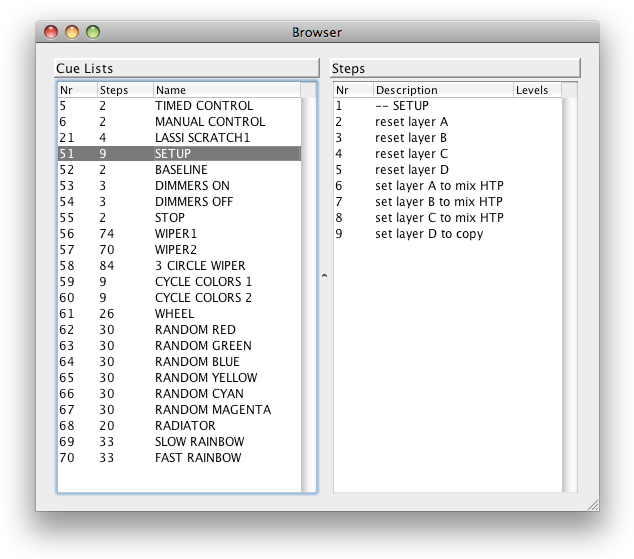
Step 7: Controlling the cue lists
During the show we want to be able to decide which of the above cue lists to run, and when to switch to a different effect. We use the web server that is embedded in Lassi to perform LayerGo commands on the Lanbox from buttons displayed in our browser window.
In the Lassi folder you will find the folder "web" which has a subfolder "root". This folder contains three files:
   index.html
   example1.jsp
   example2.jsp
The file index.html is the default page that gets shown when accessing the web server. To see this page, you first have to start the web server (Windows > Tryout >Start Web Server). In your internet browser type the following address:
http://localhost:8080/
For our show, we add a new file in the root folder:
   index.html
   example1.jsp
   example2.jsp
   simon.jsp
This is the new file contents:
    1  <jsp:useBean id="lanbox" class="be.lassi.server.WebLanbox" />
    2  <html>
    3    <head>
    4      <title>Lassi - Simon Vedelaar</title>
    5      <style type="text/css">
    6   	   .control {
    7  		  width: 150;
    8  		  height: 150;
    9  		  cursor: hand;
   10  	   }
   11      </style>
   12    </head>
   13  <body>
   14
   15  <table>
   16
   17  <tr>
   18  <td><input class="control" type="submit" value="Dimmers On" onclick='javascript:location.href="simon.jsp?cmd=LayerGo(3,53,1)"'/></td>
   19  <td><input class="control" type="submit" value="Dimmers Off" onclick='javascript:location.href="simon.jsp?cmd=LayerGo(3,54,1)"'/></td>
   20  <td><input class="control" type="submit" value="Stop" onclick='javascript:location.href="simon.jsp?cmd=LayerGo(1,55,1)"'/></td>
   21  </tr>
   22
   23  <tr>
   24  <td><input class="control" type="submit" value="Wiper 1" onclick='javascript:location.href="simon.jsp?cmd=LayerGo(1,56,1)"'/></td>
   25  <td><input class="control" type="submit" value="Wiper 2" onclick='javascript:location.href="simon.jsp?cmd=LayerGo(1,57,1)"'/></td>
   26  <td><input class="control" type="submit" value="3Circle Wiper" onclick='javascript:location.href="simon.jsp?cmd=LayerGo(1,58,1)"'/></td>
   27  </tr>
   28
   29  <tr>
   30  <td><input class="control" type="submit" value="Cycle Colors 1" onclick='javascript:location.href="simon.jsp?cmd=LayerGo(1,59,1)"'/></td>
   31  <td><input class="control" type="submit" value="Cycle Colors 2" onclick='javascript:location.href="simon.jsp?cmd=LayerGo(1,60,1)"'/></td>
   32  <td><input class="control" type="submit" value="Wheel" onclick='javascript:location.href="simon.jsp?cmd=LayerGo(1,61,1)"'/></td>
   33  </tr>
   34
   35  <tr>
   36  <td><input class="control" type="submit" value="Random Red" onclick='javascript:location.href="simon.jsp?cmd=LayerGo(1,62,1)"'/></td>
   37  <td><input class="control" type="submit" value="Random Green" onclick='javascript:location.href="simon.jsp?cmd=LayerGo(1,63,1)"'/></td>
   38  <td><input class="control" type="submit" value="Random Blue" onclick='javascript:location.href="simon.jsp?cmd=LayerGo(1,64,1)"'/></td>
   39  </tr>
   40
   41  <tr>
   42  <td><input class="control" type="submit" value="Random Yellow" onclick='javascript:location.href="simon.jsp?cmd=LayerGo(1,65,1)"'/></td>
   43  <td><input class="control" type="submit" value="Random Cyan" onclick='javascript:location.href="simon.jsp?cmd=LayerGo(1,66,1)"'/></td>
   44  <td><input class="control" type="submit" value="Random Magenta" onclick='javascript:location.href="simon.jsp?cmd=LayerGo(1,67,1)"'/></td>
   45  </tr>
   46
   47  <tr>
   48  <td><input class="control" type="submit" value="Radiator" onclick='javascript:location.href="simon.jsp?cmd=LayerGo(1,68,1)"'/></td>
   49  <td><input class="control" type="submit" value="Rainbow" onclick='javascript:location.href="simon.jsp?cmd=LayerGo(1,69,1)"'/></td>
   50  <td><input class="control" type="submit" value="Fast Rainbow" onclick='javascript:location.href="simon.jsp?cmd=LayerGo(1,70,1)"'/></td>
   51  </tr>
   52
   53  </table>
   54
   55  <p>STATUS = <%= lanbox.process(request) %> </p>
   56
   57  </body>
   58  </html>
You can bring up this page in your internet browser by typing the following address:
http://localhost:8080/simon.jsp
This is what the resulting page looks like:
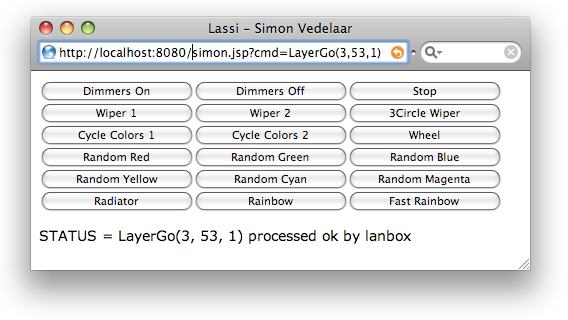
You can watch video 2 to see this control window in action.
The code on line 1 and line 55 are what make things happen.
    1  <jsp:useBean id="lanbox" class="be.lassi.server.WebLanbox" />
   55  <p>STATUS = <%= lanbox.process(request) %> </p>
Line 1 defines the "lanbox" object. This object will translate the http requests that are sent to this page into commands that are sent to the Lanbox. This translation is performed in the process(request) method. This method returns a string with the result of sending the command to the Lanbox:
LayerGo(3, 53, 1) proccesed ok by lanbox
The example above indicates that the Lanbox successfully executed a LayerGo command on layer 3 (layer "C") to start cue list 53 at cue step 1. The same syntax is used in the request that is associated to the "Wiper 1" button on line 24 (go cue list 56 step 1 in layer "A"):
simon.jsp?cmd=LayerGo(1,56,1)
Resources
Simon.java - the complete program source
simon.jsp - the control window source (save to disk)
SimonVedelaar.lcp - the LCEdit+ project file (save to disk)
Video 1 - shows the tutorial lighting effects
Video 2 - showing the LCEdit+ stage window and browser control window running the cuelists
Video 3 - show fragments of the "Simon Vedelaar" show where the effects were used
Lassi - for downloading the Lassi software
Conclusion
Following the approach described in this tutorial, we could express the lighting effects for our show in a more high level and abstract way than what we would normally do when programming the cuesteps in LCEdit+ directly.
After the initial definition of the fixtures, we no longer needed to deal with fixture addresses or channel numbers. We could refer to colors by name rather than by specifying RGB values. We could use Java language constructs, the Java library and re-use code available in Lassi to express the effects in a compact way. For this show we needed some fairly simple effects only, but it looks like the approach would work for more complicated cue lists also.
For people with a bit of programming experience, this way of working could be a valuable addition to their Lanbox programming toolbox.
You can use our feedback page if you want to send us comments on this tutorial, or to share experiences using this approach.