Midi Control
Introduction
In the Sheet Window, there are a number of different ways to set channel and submaster levels when creating cue lists:
- directly type in the level values
- use the arrow keys in combination with alt, shift or ctrl
- through ctrl-dragging the level values
- record stage values set via the dmx-in connection on the lanbox
In addition to the above possibilities, it is also possible to speed up setting the channel and submaster levels through a Midi control surface, such as the Behringer BCF2000. Currently only the BCF2000 is explicitely supported by Lassi. It may be possible to use other Midi control surfaces also.

The channel and submaster levels can be set through the motorized faders on the device. To enable this functionality in the Sheet Window, click the Midi Control checkbox in the toolbar.

With the Midi Control functionality enabled, the eight faders on the device can be assigned per group of eight adjecent level cells within a given cue (channels 1 to 8, channels 9 to 16, channels 17 to 24, submasters 1 to 8, submaster 8 to 16, etc.).
To assign the faders, click in a channel or submaster level cell. In the example below, we clicked on the cell in cue 3 channel 1. The cells to which the faders are assigned are highlighted in yellow. The fader numbers (F1 to F8) are displayed in the left most column, also highlighted in yellow.
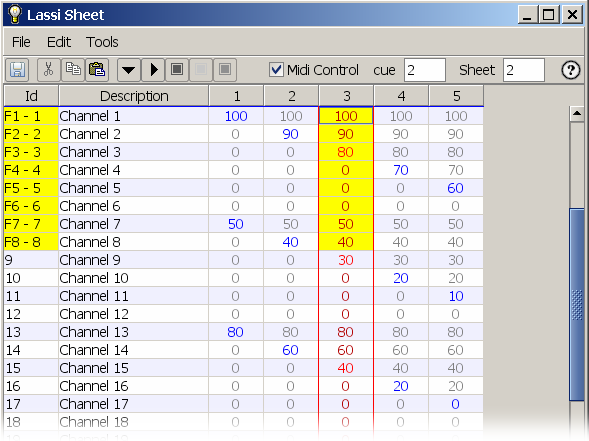
At the very moment that the faders are assigned to the cells, the motorized faders on the device move to the values that were set in those cells. When moving the faders up or down, the corresponding cell levels change.
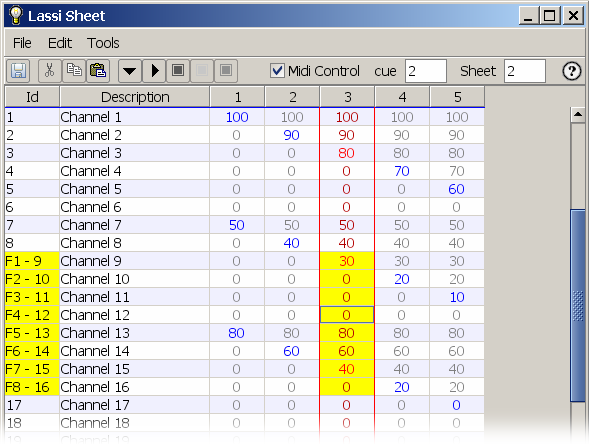
When clicking on a cell of one of the next eight channels (for example channel 12 in the screen shot below), the next range of eight channel cells is highlighted, and the moterized faders move to adjust to the values that were already set for these channels.
You can wath this demo to see this in action, or you can use the Midi Control window in Lassi to simulate the behaviour of the device.
Midi Control window
The Midi Control window can be used to verify the MIDI connection of the device with Lassi, or to simulate the device for testing or training purposes.
Open the Midi Control window using the Windows > Midi Control menu option on the main page.
The window represents the control options on the BCF2000. The sliders 1 to 8 in the window correspond to the 8 moterized faders on the BCF2000. The sliders 9 to 40 correspond to the 8 rotary enconders at the top of the device. The BCF2000 can work with 4 different groups. The group buttons on the device can be used to switch between these groups. So, although there are only 8 physical rotary encoders on the device, they are represented by 32 sliders on the window. When the currently selected group is group 1, then the first encoder is represented by slider 9. When group 2 is selected, the first encoder is represented by slider 17, group 3 > slider 25, group 4 > slider 33.

| sliders 1 to 8 | fader 1 to 8 |
| sliders 9 to 16 | encoder 1 to 8 group 1 |
| sliders 17 to 24 | encoder 1 to 8 group 2 |
| sliders 25 to 32 | encoder 1 to 8 group 3 |
| sliders 33 to 40 | encoder 1 to 8 group 4 |
The checkboxes on the window correspond to the buttons on the BCF2000.

| checkbox 1-8 | encoder push-function, group 1 |
| checkbox 9-16 | encoder push-function, group 2 |
| checkbox 17-24 | encoder push-function, group 3 |
| checkbox 25-32 | encoder push-function, group 4 |
| checkbox 33-40 | button block under encoders, top row |
| checkbox 41-48 | button block under encoders, top row |
| checkbox 49-52 | button block bottom right |
To see the Midi Control window in action, open both the Midi Control window and the Sheet window. Switch on Midi Control in the Sheet window by clicking the checkbox in the toolbar. In the Sheet window, create a few new cues by selecting Edit > Add Cues and hit OK in the dialog that appears.
Select a channel cell.
Move sliders 1 to 8 in the Midi Control window and watch how the levels change.
Select a new range of channel cells. Watch how the sliders adapt to the levels in the newly selected cells. Again move sliders 1 to 8 in the Midi Control window and watch how the levels in the new range of channel cells change.
Lassi preferences
Some configuration is required in Lassi before the Midi Control features can be used.
First make sure that the midi control is connected to your computer and switched on. After connecting the midi control, the midi environment on your computer should see an Input Device and an Output Device that will be used for the communication between Lassi and the midi control.
Note that for Lassi to detect the Input Device and the Output Device, these devices have to exist when Lassi starts.
Start Lassi.
On the main window, select Windows > Preferences > Midi Control.
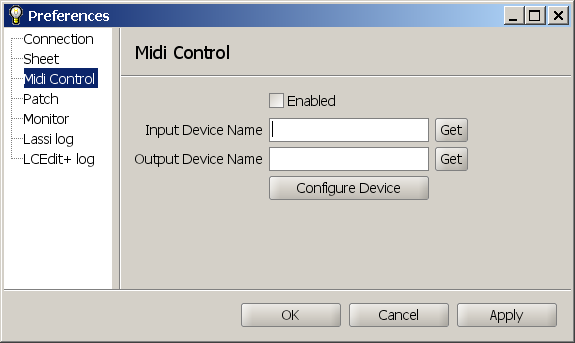
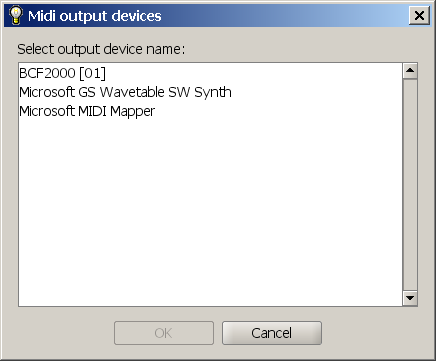
Click the Get button that is located to the right of the Input Device Name field. A dialog pops up showing all midi input devices that Lassi sees on this computer. Select the name of the device that corresponds to the midi control and click OK.
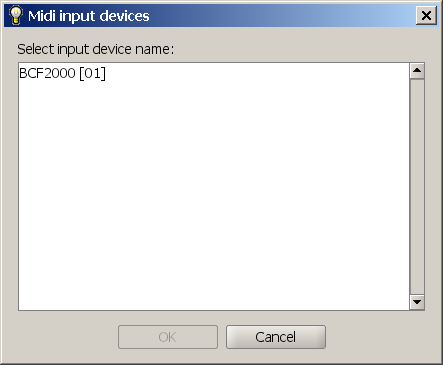
The example shows the input device that is shown in a Windows environment, when the Behringer BCF2000 midi control is connected to the computer. The device name "BCF2000 [01]" is shown when the midi drivers that are supplied by Behringer are installed.
Click the Get button that is located to the right of the Output Device Name field, and select the device that corresponds to the midi control and click OK.
Midi commands
For the control of channel and submmaster levels in the Sheet window, Lassi expects CC (Control Change) commands on channel 0, with controller number between 1 and 8 and data values between 0 and 100.
| fader | controller number |
| 1 | 1 |
| 2 | 2 |
| 3 | 3 |
| 4 | 4 |
| 6 | 5 |
| 6 | 6 |
| 7 | 7 |
| 8 | 8 |
BCF2000 configuration
The BCF2000 can be loaded with a configuration that matches perfectly with what Lassi expects from the midi control device.
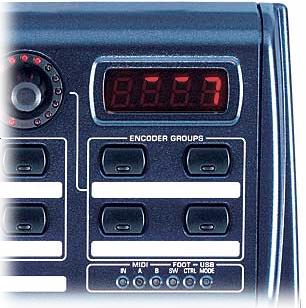
First, use the preset left and right arrow buttons on the BCF2000 to select the preset number that you want to use with Lassi. The display on the top right of the BCF2000 will change (P-1, P-2, P-3, ... ) to indicate which preset is currently selected. For presets that are currently not in use, the display will show INIT. You can select any of the presets for use with Lassi, whether they are currently in use of not.
On the main window, select Windows > Preferences > Midi Control.
On the Midi preferences window, click the Configure Device button. This will start sending midi messages to the BCF2000 to configure the preset in the edit buffer.
While the configuration data is communicated to the BCF2000, the display in the top right corner of the BCF2000 will change to indicate data is received (line following border of display).
At the same time, a progress monitor dialog in Lassi will show the progress of sending the configuration.
When the configuration is completely loaded, it is loaded in the BCF2000 edit buffer only, and will be lost when switching to a different preset or switching the device off.
To make the changes permanent in the currently selected preset, hit the Store button on the BCF2000 twice.
This completes the BCF2000 configuration. For more technical details, have a look at the midi sysex commands that are used to configure the BCF2000.