The Sheet window
Open
Open the Sheet window using the Windows > Sheet menu option on the main page.
The Sheet window is where most of the work in Lassi gets done. It allows you to set channel and submaster levels and timing for cues.
Further details such as cue prompts can be defined in the Cue List window.
Channel and submaster rows
In the Sheet window, the cue details are shown in a matrix format, much like in a spreadsheet program. Each row in the sheet represents an individual channel or submaster.
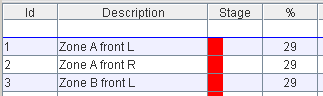
The first column on the left contains submaster and channel numbers. The submasters are numbered S1, S2, S3, etc. The channels are numbered 1, 2, 3, etc.
The descriptions of the submasters and channels can be changed by editing the text in Description cell for given row.
On the channel rows, the Stage column displays the current level on stage for the channel using an horizontal bar. The next column shows the channel level as a percentage value (100% is channel at full).
Note that the Lanbox needs to be configured to send out the mixer output using the UDP protocol. In LCEdit+ select Tools > Global Settings > UDP and enable Broadcast mixer channels.
For an explanation about the SUB column, look further down in the section on defining submasters.
Add or insert cues
Each column on the right hand side of the window represents a cue.
When first opening the Sheet window, the cue list does not contain any cues yet. A single cues can be added using the Edit > Add Cue menu option. Use Edit > Add Cues to add multiple cues in one go.
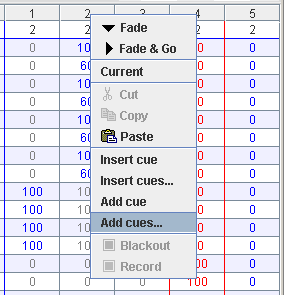
The same menu options are available from the context menu in the right hand side of the window (the empty area when the Sheet window is first opened).
There is no hard limit to the number of cues in the cue list. A show cue list can easily contain several hundreds cues. The cue list will be saved to multiple contiguous Lanbox cuelists if the maximum size of a Lanbox cuelist is exceeded.
Setting channel levels
To set a channel level in a cue, you can type the level (value between 0 and 100) in the cell at channel row and cue column.
The value of multiple cells (in multiple channels and/or multiple cues) can be changed in one go by first selecting the cells and then typing the value.
Channel levels can also be set using the arrow keys. This is often a better way, as it allows you to keep your eyes on the stage while changing the channel level values.
Using the up-arrow-key while holding down the alt-key sets the channel level to 100%. The combination of the alt-key with the down-arrow-key set the channel level to 0%.
Holding down the shift-key while hitting the up-arrow-key moves up the channel level 10% at the time. The shift-button and down-arrow-key combination decreases the channel level by 10%.
Similarly, holding down the ctrl-key in combination with the up and down arrow keys changes the channel level 1% at the time.
The up and down arrow keys can also be used to change the value of multiple selected cells in one go.
Derived values
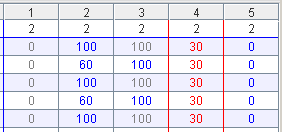
After setting the channel level in one cue, the subsequent cues also get that channel level if no channel level was previously set for these cues. These derived values are shown in a different color.
Non active values
If you want channels not to be changed in a given cue, you can enter a dash (minus character) in the channel level cells. This way the channel level remain the same during this cue, independent of its previous value. If you want to exclude channels completely from the cue list, you can select all cells of these channels in one go, and type "-". This will make this channels complete inactive for this cue list.
Set timing
The cue timing can be set on the first row. The timing is specified in seconds, and different times for fade up and fade down. Check out timing for more details.
The timing for multiple cues can be changed in one go by selecting all timing cells for those cues.
Defining submasters
In Lassi, a submaster contains a number of channels with a preset level value. These combinations of channel levels values can be used as a building blocks when creating cues.
To set channel levels for a submaster, first click on the submaster row in the table on the left. The cells in the SUB column now contain the channel levels the the selected submaster. When no submaster is selected, the cells contain dashes. The channel levels can be set by typing level values, or by using the arrow keys as described above for setting "regular" channel values.
The combination of channel level values can now be used in a cue, by setting the submaster level to 100% on given submaster row in the cue. Lower percentages can be used to reduce the channel levels, but keep the relative values as defined within the submaster.
Cue Numbering
When inserting or adding new cues to the cue list, Lassi will generate new cue numbers. The default is to number the cues 1, 2, 3, etc. A cue that is inserted between cues 1 and 2, will get number 1.1.
When possible, the new cue number will not go one level deeper: cue 1.2 is inserted between cue 1.1 and 2. Deeper cue number levels are added as needed: the cue inserted between 1.1 and 1.2 will get number 1.1.1.

The Lassi cue numbers are added as comments to the Lanbox cue list. See example output from LCEdit+ below. The dots in the cue numbers are replaced with dashes (dots cannot be used in Lanbox comments).
// Cuelist 900 (20 steps), loaded 2/01/2008 20:11
  -- Lassi 1
  -- Jan 02
  -- 20h11
  --
  -- 1
  show d06 for ever, crossfading for 2.0s
  -- 1-1
  show d08 for ever, crossfading for 2.0s
  -- 1-1-1
  show d10 for ever, crossfading for 2.0s
  -- 1-2
  show d12 for ever, crossfading for 2.0s
  -- 2
  show d14 for ever, crossfading for 2.0s
  -- 3
  show d16 for ever, crossfading for 2.0s
  -- 4
  show d18 for ever, crossfading for 2.0s
  -- 5
  show d20 for ever, crossfading for 2.0s
Individual cue numbers can be changed from the cue list window.
All cues can be renumbered in one go using the menu option Tools > Renumber cues, or from a similar menu option on one of the context popup menus.
Following cue renumbering dialog pops up:
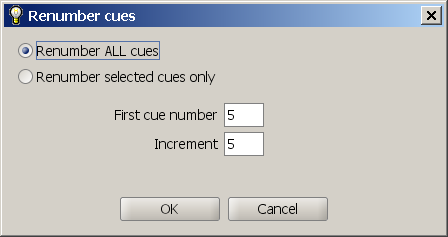
In the dialog you can indicate whether to renumber ALL cues, or only the cues that are currently selected in the Sheet window. You can specify the first cue number, and the steps between cues.
Renumbering all cues is not always practical. For example, a significant number of cue numbers may already have been written down as notes in a script. You can select a subset of cues to be renumbered in the Sheet window by clicking on the column headers (normal click on the first cue in the subset and shift-click on the last cue in the subset).
The option "Renumber selected cues only" is selected in dialog if cues were selected.
Renumbering with increments other than 1 can be useful to leave space for inserting cues later, without the immediate need for cues that use the dot notation. In the example screen shot and an increment of 5 was selected. The cue numbers will be 5, 10, 15, 20, 25, etc.
The "First cue number" field defaults to 1 if "Renumber all cues" is selected, else the initial value is the number of the first selected cue. The "Increment" field always defaults to 1.
Running the cues
Cues can be tested from the Sheet window by using the Fade and Fade & Go context menu options, or toolbar buttons.
The down-arrow button in the toolbar can be used for the Fade action. The fade action will execute the current cue. The current cue is shown in table column that is highlighted in red.
Double click the header of a given cue to make that cue the current. You can also select Current from the context menu or the Edit menu.
The Fade & Go action will execute the current cue and immediately make the next cue the current cue. Fade & Go can be performed by clicking the right-arrow button in the toolbar, or selecting the corresponding menu option from the context menu or edit menu.
Blackout
The Blackout button (the button with the black square) in the toolbar can be used to set all channel levels in the selected cue(s) to zero.
Record DMX in
The Record button (the button with the red square) in the toolbar can be used to record the channel levels currently on stage (Lanbox mixer buffer) in the currently selected cue. It does not matter how those channels levels were set. One example of setting these values would be by using the intensity wheels in the LCEdit+ control panel.
Another useful application of the Record button is to record the channel level values set by an external DMX control board. Use Tools > Global Settings > DMX > DMX input settings in LCEdit+ to configure reading the Lanbox DMX input in one of the Lanbox layers. Make sure the layers are configured (for example using HTP) so that the DMX in reaches the Lanbox mixer.
Save cue list
Once you are satisfied with the definition of the cues, you can select File > Save to Lanbox to write the cues to the Lanbox. The cues will be written to the cue list specified in the lassi.sheet.cueList parameter in the lassi.preferences file. When the number of cuesteps exceeds what fits in this cuelist (99 steps), Lassi will continue writing in the subsequent cuelists.
Dirty Indicator
A little squire on the right hand side of the status bar indicates whether the current show contains any unsaved changes. Green means no unsaved changes, blue means there are changes since the last save to file.
Group Selection
The tabs at the bottom of the sheet window can be used to select channel groups. Click a single tab to select the channels of a given group. Hold down the CTRL key while clicking an additional tab to select an additional group. Hold down the SHIFT key and click another tab to select all groups between that group and the previous selected group(s).
Click the ALL tab to unselect all groups and show all channels.
Drag channel levels
This feature is not implemented yet.
On-stage channel levels can be changed from the sheet window by dragging from the channel level indicators in the the Stage column. After selecting one or more channels, dragging to the right will fade up the selected channels, dragging to the left will fade down.
Step 1) Select one or more channels.
A single channel can be selected by clicking on any cell in the channel row on the left hand side of the sheet. Additional channels can be selected by holding down the ctrl key, and clicking on additional channel rows. To add multiple channels to the selection in one go, hold down the shift key.
Step 2) Drag from the level indicator
Move the cursor over the channel level indicator of one of the selected channels. Pushing the left mouse button down and move the cursor to the left or to right while keeping the button down. To further the mouse is moved away from the channel level indicator, the faster the levels of the channels level will change. Move to the right to make the channel levels fade up, move to the left to make the channel level fade down.
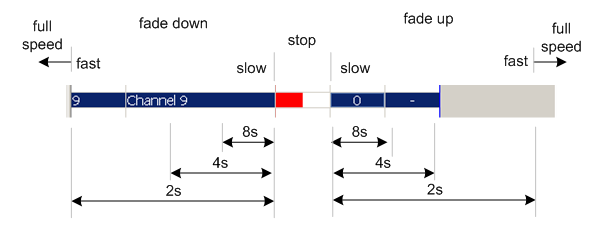
The fade speed is determined by the distance from the channel level indicator, so there is no need to move the mouse during the actual fade. You just need to move the mouse if you want the fade to go faster (move further away from level indicator), or if you want the fade to go more slowly (move towards the level indicator). The fact that you do not need to move the mouse to fade should result in a smoother fade.
The fade speed can be expressed in a percentage of the full speed. At full speed the fade time will be the default sheet fade time that is specified in the upper right corner of the sheet window. Full speed for fade down is reached at the left border of the fade window. When dragging the same distance to the right, full speed for fade up is reached.
Following example assumes a default sheet fade time of 2 seconds.