The Patch window
The Patch window can be used to assign logical channels to physical dmx dimmer channels.
Dimmer table
The table on the left of the Patch window lists all dimmers in the show. The last two columns show the channel to which each dimmer is patched.
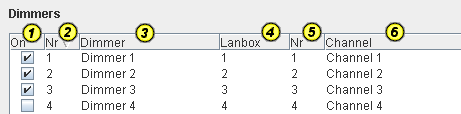
1) Column "On"
The checkboxes in column On can be used to fade in given dimmer. Check to fade-in, uncheck to fade-out. Click on the column header to move all faded-in dimmers to the top of the table. Select the fade time using Options > Fade Time. The actual fading operation in the Lanbox is performed in the layer that is selected through Options > Layer.
2) Column "Nr"
The dimmer number. Click on the header of this column to sort the dimmers on dimmer number.
3) Column "Dimmer"
The dimmer name. Double click on the cell to change a dimmer name. Click on the header of this column to sort the dimmers on dimmer name.
4) Column "Lanbox"
The number of the lanbox channel that is patched to the dimmer. This column shows the last known situation of the actual patch in the lanbox. Upon initial opening of the Patch window, the patch information is read from the lanbox and reflected in this column. To refresh this information, close and re-open the Patch window.
Patch window by default does not immediately communication changes to the show patch to lanbox. This means that the values in column Lanbox normally remain unchanged when setting the default patch, or clearing the complete patch or patching individual channels to dimmers. It is only when selecting menu option File > Save to Lanbox, that the current show patch is communicated to the Lanbox. At this moment, the column Lanbox is updated accordingly.
When selecting menu option checkbox Options > Update Lanbox patch immediately, any show patch changes are communicated to the Lanbox patch immediately, and the column Lanbox will be updated immediately.
Click on the column header to sort the dimmers table on lanbox channel number.
See also Pre-patch for further explanation of values in the lanbox channel number column.
5) Column "Nr"
The number of the channel that is patched to the dimmer. Click on the column header to sort the dimmers table on channel number.
6) Column "Channel"
The name of the channel that is patched to the dimmer. Double-click on the cell to change the channel name. Click on the column header to sort the dimmers table on channel name.
Channel table
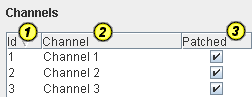
1) Column "Nr"
The channel number. Click on the column header to sort the channels on channel number.
2) Column "Channel"
The channel name. Double click the table cell to change the channel name. Click on the column header to sort the channels on channel name.
3) Column "Patched"
Read-only checkbox that indicates whether given channel is already patched to a dimmer or not. Click on the column header to move the unpatched channels to the top of the list (sorted on channel number).
Patch buttons

1) Button "Patch" (left arrow)
Patches a channel selected in the right hand table to the dimmer selected in the left hand table. If multiple channels are selected in the right hand table, these channels are patched to the dimmer range starting with the first selected dimmer in the left hand table. If a single channel is selected in the channel table, and multiple dimmers are selected in the dimmer table, the selected channel is patched to all the selected dimmers.
2) Button "Unpatch" (right arrow)
Unpatches any dimmers that are selected in the left hand table.
Drag and drop
The Patch window allows for drag and drop operations.
Patch
Select one or more channels in the channels table. Drag the channels to the first dimmer of the range of dimmers that you want to patch the channels to.
Unpatch
Select one or more dimmers in the dimmers table. Drag the dimmers outside the dimmers table on the window background or on the channels table to unpatch.
Export patch information
Select one or more dimmers in the dimmers table. Drag the dimmers to another application such as Microsoft Word or Excel. The patch information is exported as a tab-separted string. In Excel this results in separate cells used for the separate cells in the dimmers table in the Patch window.
Select one or more channels in the channel table. Drag the channels to another application. The channel information is exported as a tab-separted string.
Menu Options
File Menu
Load from Lanbox
Loads the patch information from lanbox, and changes to show patch to match the patch in the Lanbox. If you only want to know what the Lanbox looks like (without updating the show patch), you can close and re-open the Patch window instead. In this case only column Lanbox will be updated, and the show patch remains unchanged.
Save to Lanbox
Communicates the current show patch to the Lanbox, and updates the Lanbox patch.
Close
Closes the Patch window.
Options Menu
Stage follows selection
When this option is selected, dimmers will be faded-in when they are selected in the dimmer table, and faded-out when they are no longer selected.
Update Lanbox patch immediately
When this option is selected, the lanbox patch is updated immediately as changes are made in the Patch window to the show patch information. When this option is selected, there is no more need to use File > Save to Lanbox to communicate patch changes to the Lanbox.
Layer
Opens a sub-menu from which the layer that will be used for the fading operations during patching (through the checkboxes in the first column of the dimmer table) can be selected. Make sure that any layers above the selected layer let the values in the selected layer go through (set to HTP).
Fade Time
Opens a sub-menu to select the fade time.
Actions Menu
Blackout
Unchecks any checkboxes in the first column of the dimmers table and fades out the dimmers for which the checkbox was checked.
Clear Patch
Unpatches all dimmers.
Default Patch
Makes a default one-to-one patch: channel 1 is patched to dimmer 1, channel 2 is patched to dimmer 2, etc.
Copy channel names to dimmer names
Copies the names of the channels to the names of the dimmers that these channels have been patched to. The names of the dimmers that are not patched (yet) remain unchanged.
Copy dimmer names to channel names
Copies the names of the dimmers that have been patched to the names of the channels that these dimmers have been patched to. The names of the channels that are not patched (yet) remain unchanged.
Copy patch to clipboard
Copies the dimmer table to the clipboard.
Pre-patch
The checkboxes in column On can be used to fade in given dimmer. It would be usefull to be able to fade in a given dimmer to verify on stage exactly which lantern is connected to this dimmer. In principle however, a dimmer cannot be faded in until a channel is patched to it.
That is why the concept of Pre-patch is introduced. Pre-patch works only when the total number of dimmers in the show is less than or equal to 256. With "Pre-patch" all unpatched dimmers are patched to channels 257 to 512 (dimmer 1 is patched to channel 257, dimmer 2 is patched to channel 258, etc.). This allows Lassi to use channels 257 and 258 to fade up dimmers 1 and 2, even before these dimmers are patched to channels in the range of available channels in the show.
Once the "real" channels are patched to the dimmers, these "real" channels are used to fade in the dimmers. Note that this means that when a given channel is patched to multiple dimmers, all dimmers patched to that channel will be faded in, also if only one of the dimmers is selected.
Tasks
Patch single channel
These are the steps to patch a single channel to a single dimmer:
- Select the channel in the channel table.
- Select the dimmer in the dimmer table.
- Click the left-arrow button.
Or: drag the channel from the channel table on to the dimmer in the dimmer table.
Patch single channel to multiple dimmers
These are the steps to patch a single channel to multiple dimmers in one go:
- Select the channel in the channel table.
- Select all dimmers that this channel should be patched to in the dimmer table. Hold down the shift key to select adjecent dimmers, or hold down the control key to select dimmers that are not adjecent.
- Click the left-arrow button.
Patch multiple channels
These are the steps to patch multiple channels to a range of dimmers in one go:
- In the channel table, select all channels that you want to patch.
- In the dimmer table, select the first dimmer of the range of dimmers that you want to patch the channels to.
- Click the left-arrow button.
Note that selecting multiple dimmers in the dimmer table does not have any effect here. The dimmer range always starts with the first dimmer that is selected. The dimmers following that first dimmer are patched to the selected channels.
Or: drag the selected channels to the first dimmer in the range.
Unpatch dimmer
These are the steps to unpatch a given dimmer:
- Select a patched dimmer in the dimmer table.
- Click the right-arrow button.
"Walk" the channels
At times it may be useful to fade-in/fade-out each of the channels one by one. This allows us for example to verify if the lantern focus is still ok and no lamps have burned out. These would be the steps to "walk" the channels:
- Click on the channel number column header in the dimmer table. This makes sure the channels are sorted in a logical order; for example according to position on stage or function within the play.
- Select menu option Option > Stage follows selection.
- Click on the first row: the first channel is faded in.
- Click on the keyboard down arrow key: the first channel is faded out, and the second channel is faded in.
- Repeat the previous step until done.
"Walk" the dimmers
Although it may be less useful, it is possible to "walk" the dimmers in a similar way: just make sure to sort on dimmer number first.
Patch prepared channels
Following scenario could be used when preparing channel definitions in advance (before going into the theatre), and assuming that the dimmer patch information is not known in advance:
- Enter name for each channel. Double click on channel name to activate editor.
- Re-order channels until they are in some order that makes logical sense for the design (for example order according to position on stage, according to function within the play, etc.). Drag and drop the channel names within the channel table to change their sorting order.
- Once in the theatre: select Option > Stage follows selection.
- In the channels table, click on the header in column Patched. The channels that are not patched yet will be first in the list; newly patched channels will be moved down in the list.
- Select a dimmer.
- As the corresponding lantern lights up on stage, drag the appropriate channel to that dimmer.
- Repeat the two previous steps until done.
- Once all dimmers are patched: select Actions > Copy channel names to dimmer names.
- De-select Option > Stage follows selection.
- Select File > Save to Lanbox.
- Save the show file.
Focus the lanterns
While focussing the lanterns (pointing into the right direction) it is often desirable to fade in channels one by one, but also to fade in 2 or 3 channels to verify overlap, etc. The idea would be to leave Option > Stage follows selection unchecked, and to use the checkboxes in the On column in the dimmer table instead.
In addition it is often desirable not to completely blackout all lights on stage (for safety reasons, and to make moving around on stage easier). This is why the Patch window is made to use a particular layer to control fade in and fade out, and that this layer can be changed. The Patch window can be made to work in layer B, while some channels are set to a constant low level in layer A. Make sure to set layer A to mix HTP (highest takes precendence) to let the Patch window fades come through.